1. 设置
1.1 NVidia 驱动程序和CUDA 工具包
1.1.1 NVidia 驱动程序
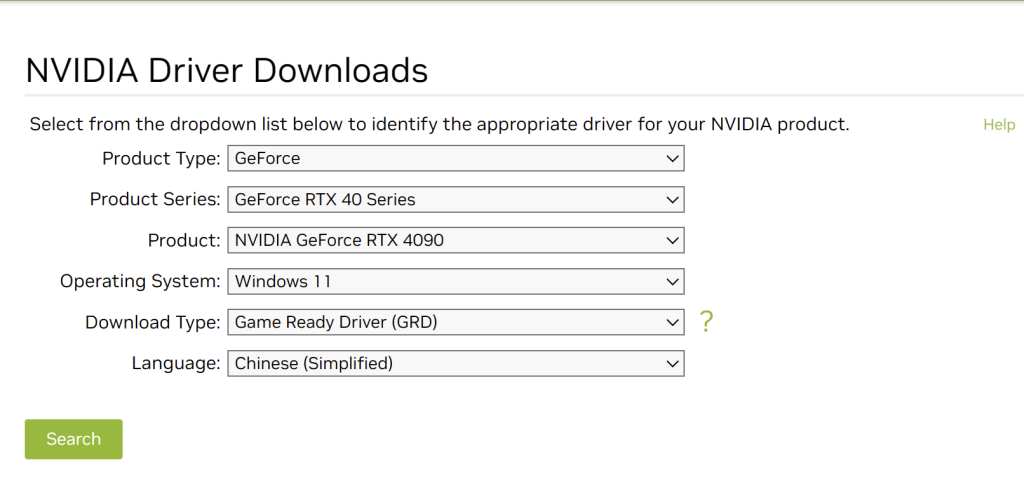
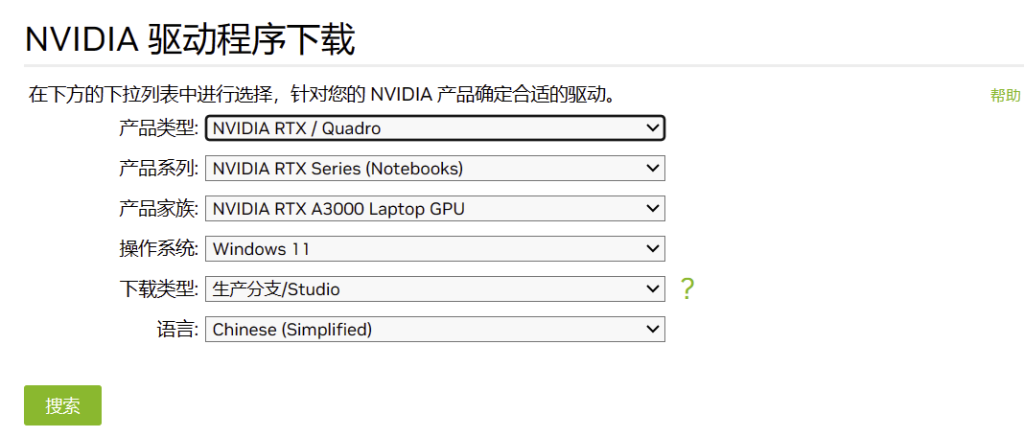
在选择NVIDIA驱动程序时,有两种主要类型:Game Ready Driver (GRD) 和 Studio Driver (SD)。这两者的选择取决于您的主要用途:
- Game Ready Driver (GRD):这种类型的驱动程序主要针对游戏玩家设计,确保最新的游戏能够在发布时获得最佳性能和体验。如果您主要用显卡玩游戏,那么GRD是较好的选择。
- Studio Driver (SD):这种驱动程序是为创意专业人士设计的,例如那些从事视频编辑、3D渲染、图形设计和其他形式的创作内容的人。Studio Driver为这些应用程序提供了更稳定和优化的支持。
由于您提到是用于AI训练,Studio Driver (SD) 更适合您的需求。它为专业软件和工作负载提供了优化和稳定性,特别是在处理图形和计算密集型任务时,这对AI训练是非常重要的。
https://www.nvidia.com/download/index.aspx

如果使用中文界面,可以使用下面的链接
https://www.nvidia.cn/Download/index.aspx?lang=zh-cn

1.1.2 NVidia CUDA 工具包
https://developer.nvidia.com/cuda-downloads
检查 nvidia-smi.exe 和 nvcc.exe 中对 cuda 编译工具的 GPU 支持。/11/12.
1.2 Git
https://git-scm.com/download/win
1.3 Python
https://www.python.org/downloads/windows/
1.4 Go
1.5 Gcc
下滑找到 .exe 文件,比如下面的链接:
https://github.com/msys2/msys2-installer/releases/download/2024-05-07/msys2-x86_64-20240507.exe
下载完成后,点击 msys2-x86_64-20240507.exe 运行:
选择默认安装路径就可以,默认安装路径是 C:\msys64
点击运行 mingw64.exe
安装 gcc 和 mingw32-make
|
1 |
pacman -S mingw-w64-x86_64-toolchain |
如果要更新系统:
|
1 |
pacman -Syu |
验证 gcc
|
1 2 3 4 5 6 7 8 9 10 11 12 13 14 15 16 17 18 19 |
where gcc C:\msys64\mingw64\bin\gcc.exe $ gcc --version gcc.exe (Rev2, Built by MSYS2 project) 14.1.0 Copyright (C) 2024 Free Software Foundation, Inc. This is free software; see the source for copying conditions. There is NO warranty; not even for MERCHANTABILITY or FITNESS FOR A PARTICULAR PURPOSE. where mingw32-make C:\msys64\mingw64\bin\mingw32-make.exe mingw32-make.exe --version GNU Make 4.4.1 Built for Windows32 Copyright (C) 1988-2023 Free Software Foundation, Inc. License GPLv3+: GNU GPL version 3 or later <https://gnu.org/licenses/gpl.html> This is free software: you are free to change and redistribute it. There is NO WARRANTY, to the extent permitted by law. |
点击 gcc.exe 路径到windows 系统路径下
|
1 |
C:\msys64\mingw64\bin |
1.6 Cmake
1.7 ollama
需要安装一个 ollama 的运行环境,下面的步骤会需要。
https://ollama.com/download/OllamaSetup.exe
2. 验证安装包
2.1 克隆 ollama
|
1 2 3 4 5 6 7 8 9 10 11 12 13 14 15 16 17 18 19 20 21 22 23 24 25 26 27 28 29 30 31 32 33 |
gigit clone --recurse-submodules https://github.com/jmorganca/ollama Cloning into 'ollama'... remote: Enumerating objects: 16306, done. remote: Counting objects: 100% (1012/1012), done. remote: Compressing objects: 100% (564/564), done. remote: Total 16306 (delta 584), reused 812 (delta 445), pack-reused 15294 Receiving objects: 100% (16306/16306), 10.05 MiB | 2.49 MiB/s, done. Resolving deltas: 100% (10212/10212), done. Submodule 'llama.cpp' (https://github.com/ggerganov/llama.cpp.git) registered for path 'llm/llama.cpp' Cloning into '/mnt/e/ollama/ollama-gpu/ollama/llm/llama.cpp'... remote: Enumerating objects: 15930, done. remote: Counting objects: 100% (15930/15930), done. remote: Compressing objects: 100% (5519/5519), done. remote: Total 15930 (delta 11617), reused 14309 (delta 10217), pack-reused 0 Receiving objects: 100% (15930/15930), 35.29 MiB | 1.53 MiB/s, done. Resolving deltas: 100% (11617/11617), done. remote: Enumerating objects: 11, done. remote: Counting objects: 100% (11/11), done. remote: Compressing objects: 100% (2/2), done. remote: Total 2 (delta 1), reused 1 (delta 0), pack-reused 0 Unpacking objects: 100% (2/2), 915 bytes | 35.00 KiB/s, done. From https://github.com/ggerganov/llama.cpp * branch 74f33adf5f8b20b08fc5a6aa17ce081abe86ef2f -> FETCH_HEAD Submodule path 'llm/llama.cpp': checked out '74f33adf5f8b20b08fc5a6aa17ce081abe86ef2f' Submodule 'kompute' (https://github.com/nomic-ai/kompute.git) registered for path 'llm/llama.cpp/kompute' Cloning into '/mnt/e/ollama/ollama-gpu/ollama/llm/llama.cpp/kompute'... remote: Enumerating objects: 9090, done. remote: Counting objects: 100% (225/225), done. remote: Compressing objects: 100% (134/134), done. remote: Total 9090 (delta 99), reused 174 (delta 81), pack-reused 8865 Receiving objects: 100% (9090/9090), 17.58 MiB | 3.79 MiB/s, done. Resolving deltas: 100% (5706/5706), done. Submodule path 'llm/llama.cpp/kompute': checked out '4565194ed7c32d1d2efa32ceab4d3c6cae006306' |
2.2 验证前面的安装包
2.2.1 验证 nvcc
|
1 2 3 4 5 6 7 8 9 |
where nvcc C:\Program Files\NVIDIA GPU Computing Toolkit\CUDA\v12.4\bin\nvcc.exe nvcc --version nvcc: NVIDIA (R) Cuda compiler driver Copyright (c) 2005-2024 NVIDIA Corporation Built on Thu_Mar_28_02:30:10_Pacific_Daylight_Time_2024 Cuda compilation tools, release 12.4, V12.4.131 Build cuda_12.4.r12.4/compiler.34097967_0 |
2.2.2 验证 git
|
1 2 3 4 5 |
where git C:\Program Files\Git\cmd\git.exe git -v git version 2.45.0.windows.1 |
2.2.3 验证 python
|
1 2 |
python --version Python 3.11.9 |
2.2.3 验证 cmake
|
1 2 3 4 5 6 7 |
where cmake C:\Program Files\CMake\bin\cmake.exe cmake --version cmake version 3.29.3 CMake suite maintained and supported by Kitware (kitware.com/cmake). |
2.2.4 验证 go
|
1 2 3 4 5 |
where go C:\Program Files\Go\bin\go.exe go version go version go1.22.3 windows/amd64 |
2.2.5 验证例子
这一步可以不做,如果顺利的话
通过验证 .\examples\langchain-document\main.py 来达到验证过程
我们创建一个环境,这里用conda
|
1 2 3 4 5 6 7 |
conda create -yn ollama-gpu conda activate ollama-gpu cd ollama cd examples\langchain-python-rag-document pip install -r requirements.txt |
可能会出现警告:
|
1 2 |
ERROR: Could not find a version that satisfies the requirement tensorflow-macos==2.13.0 (from versions: none) ERROR: No matching distribution found for tensorflow-macos==2.13.0 |
这个是针对 macos的,不用理。注释掉 requirements.txt 中报错的部分,下面是注释的部分
|
1 2 3 |
#pdfminer==20191125 #tensorflow-macos==2.13.0 #uvloop==0.17.0 |
可能还需要安装别的包,根据运行下面的 main.py 增加就可以。
运行 main.py
|
1 |
python main.py |
正常运行后,应该没有任何警告,在查询后面输入:
|
1 |
How many locations does WeWork have? |
|
1 2 3 4 |
python main.py Query: How many locations does WeWork have? As of June 2023, WeWork has 777 locations around the world. |
3. 编译 ollama
打开 Windows PowerShell
|
1 2 3 4 5 6 7 |
cd ollama $env:CGO_ENABLED="1" $env:GIN_MODE="release" go generate .\... go build . |
如果下载很慢,可以使用国内的 golang 代理
|
1 |
$env:GOPROXY = "https://goproxy.cn,direct" |
4. 测试编译后的结果
|
1 2 3 4 5 6 7 8 9 |
ls -l .\ollama.exe 目录: E:\ollama-gpu\ollama Mode LastWriteTime Length Name ---- ------------- ------ ---- -a---- 2024-05-12 5:25 64805673 ollama.exe |
速度快很多
5. 编译 ollama CLI, ollama app 和 ollama installer
需要下载 https://jrsoftware.org/isinfo.php
点击 ,Download Inno Setup 进入到 https://jrsoftware.org/isdl.php
点击 https://jrsoftware.org/download.php/is.exe
然后执行编译命令:
|
1 |
powershell -ExecutionPolicy Bypass -File .\scripts\build_windows.ps1 |
在 dist 目录下会又两个文件
OllamaSetup.exe, 安装程序
ollama-windows-amd64.zip 压缩包
建议手动先删除原来的安装包,不然,可能还会调用原先的包。安装路径在你的用户名下,把UserName 替换为你的用户名。
C:\Users\UserName\AppData\Local\Programs\Ollama
ollama 的日志
C:\Users\UserName\AppData\Local\Ollama\ 目录下